Team:Dalton School NY/Notebook
From 2012hs.igem.org
(→Obtaining the remaining clones) |
|||
| (15 intermediate revisions not shown) | |||
| Line 1: | Line 1: | ||
==Testing of DNA prepared by several methods== | ==Testing of DNA prepared by several methods== | ||
| - | Yeast genomic DNA is commonly prepared using a phenol/chloroform based method. Because both phenol and chloroform are toxic chemicals, we tested several methods for preparing yeast genomic DNA that do not use these chemicals. We compared a method that uses LiOAc to disrupt the yeast cell wall ([http://www.biotechniques.com/multimedia/archive/00147/BTN_A_000113672_O_147315a.pdf BioTechniques 50:325-328, 2011]) to methods that use the enzyme zymolyase to disrupt the cell wall (a Promega kit or a [http://www.bio.brandeis.edu/haberlab/jehsite/pdfs/ZymoPrep.pdf protocol from Jim Haber’s lab], “JH zym”). For the Haber lab protocol, we did not include beta mercaptoethanol in the zymolyase solution, realizing that without this the zymolyase step might take longer. We used the procedure in the Haber lab protocol to check the completion of the zymolyase digestion for the Promega protocol and the Haber lab protocol. DNA from all protocols was treated with RNase A. The Haber lab protocol produced the greatest yield of genomic DNA, but DNA made using the Promega kit was used in subsequent PCRs because it seemed to produce the most consistent results. 1µl, 2µl, or 5µl of genomic DNA was used in each PCR reaction with LIF1 promoter primers. The exception was that the DNA prepared using the Haber lab protocol was diluted 1:10 because it was about 10X more concentrated than the DNA prepared using the other methods. Following these initial tests, 1µl of yeast genomic DNA was used for subsequent PCRs. The LiOAc method was the shortest and least expensive and we may switch to this method when future DNA preps for PCR are needed. It should be noted that in retrospect, the PCR reactions below were too robust to fairly compare the DNA preps. DNA would need to be diluted and/or the cycles would need to be shortened to come close to having PCR reactions in the linear range. However, we learned from this that we had successfully prepared genomic DNA, so we moved forward. | + | Yeast genomic DNA is commonly prepared using a phenol/chloroform based method. Because both phenol and chloroform are toxic chemicals, we tested several methods for preparing yeast genomic DNA that do not use these chemicals. We compared a method that uses lithium acetate (LiOAc) to disrupt the yeast cell wall ([http://www.biotechniques.com/multimedia/archive/00147/BTN_A_000113672_O_147315a.pdf BioTechniques 50:325-328, 2011]) to methods that use the enzyme zymolyase to disrupt the cell wall (a Promega kit or a [http://www.bio.brandeis.edu/haberlab/jehsite/pdfs/ZymoPrep.pdf protocol from Jim Haber’s lab], “JH zym”). For the Haber lab protocol, we did not include beta mercaptoethanol (also toxic) in the zymolyase solution, realizing that without this the zymolyase step might take longer. We used the procedure in the Haber lab protocol to check the completion of the zymolyase digestion for the Promega protocol and the Haber lab protocol. DNA from all protocols was treated with RNase A. The Haber lab protocol produced the greatest yield of genomic DNA, but DNA made using the Promega kit was used in subsequent PCRs because it seemed to produce the most consistent results. 1µl, 2µl, or 5µl of genomic DNA was used in each PCR reaction with LIF1 promoter primers. The exception was that the DNA prepared using the Haber lab protocol was diluted 1:10 because it was about 10X more concentrated than the DNA prepared using the other methods. Following these initial tests, 1µl of yeast genomic DNA was used for subsequent PCRs. The LiOAc method was the shortest and least expensive and we may switch to this method when future DNA preps for PCR are needed. It should be noted that in retrospect, the PCR reactions below were too robust to fairly compare the DNA preps. DNA would need to be diluted and/or the cycles would need to be shortened to come close to having PCR reactions in the linear range. However, we learned from this that we had successfully prepared genomic DNA, so we moved forward. |
| Line 42: | Line 42: | ||
:1 cycle of: | :1 cycle of: | ||
| - | :68°C 5 min | + | ::68°C 5 min |
| + | 2% agarose gels in 1X Sodium Borate buffer: [http://www.biotechniques.com/multimedia/archive/00036/BTN_A_04362BM02_O_36180a.pdf BioTechniques 36:214-216 (February 2004)] | ||
| + | |||
| + | "LiOAc (liq)" = Lithium acetate, prepped from yeast in liquid culture | ||
| + | |||
| + | "LiOAc (col)" = Lithium acetate, prepped from a yeast colony | ||
| + | |||
| + | "JH zym" = Prepped with Haber lab zymolyase protocol | ||
| + | |||
| + | "Promega" = Prepped with Promega Wizard Genomic DNA kit | ||
[[Image:Dalton_Fig7.jpg]] | [[Image:Dalton_Fig7.jpg]] | ||
| Line 50: | Line 59: | ||
We did an isolation of genomic DNA from yeast using the Promega Wizard Genomic DNA Purification Kit- cat# A1120. We substituted 20T zymolyase (Seikagaku) for lyticase and monitored the zymolyase digestion for completion. | We did an isolation of genomic DNA from yeast using the Promega Wizard Genomic DNA Purification Kit- cat# A1120. We substituted 20T zymolyase (Seikagaku) for lyticase and monitored the zymolyase digestion for completion. | ||
| + | |||
| + | PCR primers were designed by students and supplied by IDT. | ||
For PCR, we used: | For PCR, we used: | ||
| - | :Yeast Genomic DNA: 1µl | + | :Yeast Genomic DNA: 1µl OR 1µl of 5ng/µl fluorescent protein plasmid |
:2X OneTaq Mix (NEB): 25µl | :2X OneTaq Mix (NEB): 25µl | ||
| Line 101: | Line 112: | ||
There may be more nonspecific bands in these PCR reactions than is typical either because there was a considerable delay waiting for all students to be ready to add their tubes to the PCR machine or because we had an issue where the program was initially incorrect and we needed to restart the PCR machine after correcting the problem. | There may be more nonspecific bands in these PCR reactions than is typical either because there was a considerable delay waiting for all students to be ready to add their tubes to the PCR machine or because we had an issue where the program was initially incorrect and we needed to restart the PCR machine after correcting the problem. | ||
| - | Then we conducted a gel extraction, using QIAquick Gel Extraction Kit. | + | We cut the bands of the correct size out of the gel. Then we conducted a gel extraction, using QIAquick Gel Extraction Kit. |
==Blunting the PCR Product== | ==Blunting the PCR Product== | ||
| Line 144: | Line 155: | ||
==Transformation== | ==Transformation== | ||
| - | For the transformation, we used NEB 10-beta Competent E. coli cells (cat # C3019H). We followed the manufacturer's suggested protocol for the transformation, and we plated on Ampicillin/IPTG/X-Gal. | + | For the transformation, we used NEB 10-beta Competent E. coli cells (cat # C3019H). We followed the manufacturer's suggested protocol for the transformation, and we plated on LB/Ampicillin/IPTG/X-Gal. |
==BsaI-digested Miniprep DNA == | ==BsaI-digested Miniprep DNA == | ||
Overall, most plates contained a mixture of blue and white colonies and the number of colonies was fairly low - not much higher than for our "no insert" ligations. | Overall, most plates contained a mixture of blue and white colonies and the number of colonies was fairly low - not much higher than for our "no insert" ligations. | ||
| - | We then picked two white colonies from each plate and inoculated 2ml of LB/amp and then mini-prepped the DNA. Blue colonies had intact lacZ genes, and therefore did not contain inserts. The samples on these gels contain BsaI-digested miniprep DNA prepared from individual colonies from the transformations above. | + | We then picked two white colonies from each plate and inoculated 2ml of LB/amp and then mini-prepped the DNA. Blue colonies had intact lacZ genes, and therefore did not contain inserts. The samples on these gels contain BsaI-digested miniprep DNA prepared from individual white colonies from the transformations above. |
For the BsaI Digest, we used: | For the BsaI Digest, we used: | ||
| Line 168: | Line 179: | ||
pUC19 (no insert): 1 cut, 1 band: 2686 bp | pUC19 (no insert): 1 cut, 1 band: 2686 bp | ||
| - | pUC19 + insert: 3 cuts, 3 bands: 1354 bp, 1332 bp, insert (expected sizes listed on gel below) | + | pUC19 + insert: 3 cuts, 3 bands: 1354 bp, 1332 bp, insert (expected sizes listed on gel below). |
Almost all inserts are a single BsaI fragment, but there is an internal BsaI site in the TEF1, ENO1, EAF6, and MSN4 promoters so 2 band sizes are listed for these inserts. | Almost all inserts are a single BsaI fragment, but there is an internal BsaI site in the TEF1, ENO1, EAF6, and MSN4 promoters so 2 band sizes are listed for these inserts. | ||
| Line 305: | Line 316: | ||
1. Repeat the original blunt ligations using a higher insert:vector ratio. | 1. Repeat the original blunt ligations using a higher insert:vector ratio. | ||
| - | 2. Try a sticky-end ligation strategy since it may have a higher success rate than the blunt ligation strategy. | + | |
| + | 2. Try a sticky-end ligation strategy since it may have a higher success rate than the blunt ligation strategy. This strategy is outlined in detail below: | ||
When we designed the PCR primers, we added nucleotides 5' to the BSA recognition site in both the forward and reverse primers. We decided to introduce the sequence 5' CCCGGG 3'which is the site for both SmaI (creates blunt ends) and XmaI (creates sticky ends). According to the NEB catalog, SmaI and XmaI can cut very close to the end of a PCR product. Thus, the introduction served as a backup strategy if the blunt cloning was problematic. The PCR products could be cut with XmaI and ligated into XmaI-digested pUC19. | When we designed the PCR primers, we added nucleotides 5' to the BSA recognition site in both the forward and reverse primers. We decided to introduce the sequence 5' CCCGGG 3'which is the site for both SmaI (creates blunt ends) and XmaI (creates sticky ends). According to the NEB catalog, SmaI and XmaI can cut very close to the end of a PCR product. Thus, the introduction served as a backup strategy if the blunt cloning was problematic. The PCR products could be cut with XmaI and ligated into XmaI-digested pUC19. | ||
| Line 424: | Line 436: | ||
| - | 5µl of ligation reaction were transformed and plated on LB/Amp/X-gal/IPTG. | + | 5µl of ligation reaction were transformed and 150µl of the transformation was plated on LB/Amp/X-gal/IPTG. |
After about 18hrs, the plates with promoter clones had normal-sized colonies, but the colonies on the plates for the fluorescent protein coding sequences were just barely visible. We realized in retrospect that we probably shouldn't have plated the cells for the fluorescent protein sequences on IPTG/X-gal plates. The IPTG induced transcription of B-galactosidase with the fluorescent protein insertion. We know from previous experience with fluorescent protein plasmids that these proteins are somewhat toxic. The toxicity of the fluorescent proteins could explain the small size of the colonies. We would suggest not using blue/white selection for future cloning of protein-coding sequences. These fluorescent protein plates were allowed to grow 2 more days at room temperature before colonies were picked (2 days because we couldn't access the school building on a Sunday). We picked 2 colonies from each plate into LB/amp and miniprepped the DNA. Several of the colonies that we picked from the blunt cloning plates for the fluorescent proteins failed to grow in LB/amp. | After about 18hrs, the plates with promoter clones had normal-sized colonies, but the colonies on the plates for the fluorescent protein coding sequences were just barely visible. We realized in retrospect that we probably shouldn't have plated the cells for the fluorescent protein sequences on IPTG/X-gal plates. The IPTG induced transcription of B-galactosidase with the fluorescent protein insertion. We know from previous experience with fluorescent protein plasmids that these proteins are somewhat toxic. The toxicity of the fluorescent proteins could explain the small size of the colonies. We would suggest not using blue/white selection for future cloning of protein-coding sequences. These fluorescent protein plates were allowed to grow 2 more days at room temperature before colonies were picked (2 days because we couldn't access the school building on a Sunday). We picked 2 colonies from each plate into LB/amp and miniprepped the DNA. Several of the colonies that we picked from the blunt cloning plates for the fluorescent proteins failed to grow in LB/amp. | ||
| + | BsaI digests to check the clones: | ||
:miniprep DNA: 3µl | :miniprep DNA: 3µl | ||
| Line 449: | Line 462: | ||
'''Promoters''' | '''Promoters''' | ||
| - | LIF1 yes: X2 | + | :LIF1 yes: X2 |
| - | ENO1 yes: X1,X2,B1,B2 | + | :ENO1 yes: X1,X2,B1,B2 |
| - | TEF1 yes: X1,X2,B1 | + | :TEF1 yes: X1,X2,B1 |
| - | HSC82 yes: X1,X2,B1,B2 | + | :HSC82 yes: X1,X2,B1,B2 |
| - | MSN4 yes: X2,B1,B2 | + | :MSN4 yes: X2,B1,B2 |
'''Protein-coding sequences''' | '''Protein-coding sequences''' | ||
| - | BFP yes: X1,X2 | + | :BFP yes: X1,X2 |
| + | |||
| + | :GFP yes: X1,X2 | ||
| - | + | :YFP yes: X1,X2 | |
| - | + | :mTangerine yes: X1,X2, B2 | |
| - | + | :mCherry yes: X2 | |
| - | + | :mGrape1 yes: X1,X2 | |
| - | |||
NOW WE HAVE ALL THE CLONES!!! | NOW WE HAVE ALL THE CLONES!!! | ||
Latest revision as of 22:55, 6 June 2012
Contents |
Testing of DNA prepared by several methods
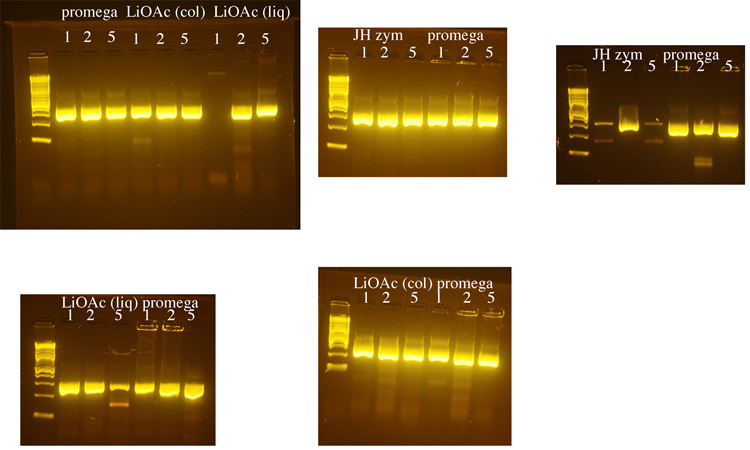
Yeast genomic DNA is commonly prepared using a phenol/chloroform based method. Because both phenol and chloroform are toxic chemicals, we tested several methods for preparing yeast genomic DNA that do not use these chemicals. We compared a method that uses lithium acetate (LiOAc) to disrupt the yeast cell wall ([http://www.biotechniques.com/multimedia/archive/00147/BTN_A_000113672_O_147315a.pdf BioTechniques 50:325-328, 2011]) to methods that use the enzyme zymolyase to disrupt the cell wall (a Promega kit or a [http://www.bio.brandeis.edu/haberlab/jehsite/pdfs/ZymoPrep.pdf protocol from Jim Haber’s lab], “JH zym”). For the Haber lab protocol, we did not include beta mercaptoethanol (also toxic) in the zymolyase solution, realizing that without this the zymolyase step might take longer. We used the procedure in the Haber lab protocol to check the completion of the zymolyase digestion for the Promega protocol and the Haber lab protocol. DNA from all protocols was treated with RNase A. The Haber lab protocol produced the greatest yield of genomic DNA, but DNA made using the Promega kit was used in subsequent PCRs because it seemed to produce the most consistent results. 1µl, 2µl, or 5µl of genomic DNA was used in each PCR reaction with LIF1 promoter primers. The exception was that the DNA prepared using the Haber lab protocol was diluted 1:10 because it was about 10X more concentrated than the DNA prepared using the other methods. Following these initial tests, 1µl of yeast genomic DNA was used for subsequent PCRs. The LiOAc method was the shortest and least expensive and we may switch to this method when future DNA preps for PCR are needed. It should be noted that in retrospect, the PCR reactions below were too robust to fairly compare the DNA preps. DNA would need to be diluted and/or the cycles would need to be shortened to come close to having PCR reactions in the linear range. However, we learned from this that we had successfully prepared genomic DNA, so we moved forward.
For PCR, we used:
- Yeast Genomic DNA: 1µl or 2µl or 5µl
- 2X OneTaq Mix (NEB): 25µl
- 5µM Forward primer: 2.5µl
- 5µM Reverse primer: 2.5µl
- H2O: 19µl or 18µl or 15µl
Cycling conditions
- 1 cycle of:
- 94°C 5 min
- 15 cycles of:
- 94°C 30 sec
- 50°C 30 sec
- 68°C 45 sec
- 30 cycles of:
- 94°C 30 sec
- 55°C 30 sec
- 68°C 45 sec
- 1 cycle of:
- 68°C 5 min
2% agarose gels in 1X Sodium Borate buffer: [http://www.biotechniques.com/multimedia/archive/00036/BTN_A_04362BM02_O_36180a.pdf BioTechniques 36:214-216 (February 2004)]
"LiOAc (liq)" = Lithium acetate, prepped from yeast in liquid culture
"LiOAc (col)" = Lithium acetate, prepped from a yeast colony
"JH zym" = Prepped with Haber lab zymolyase protocol
"Promega" = Prepped with Promega Wizard Genomic DNA kit
PCR of promoters and fluorescent protein coding sequences
We did an isolation of genomic DNA from yeast using the Promega Wizard Genomic DNA Purification Kit- cat# A1120. We substituted 20T zymolyase (Seikagaku) for lyticase and monitored the zymolyase digestion for completion.
PCR primers were designed by students and supplied by IDT.
For PCR, we used:
- Yeast Genomic DNA: 1µl OR 1µl of 5ng/µl fluorescent protein plasmid
- 2X OneTaq Mix (NEB): 25µl
- 5µM Forward primer: 2.5µl
- 5µM Reverse primer: 2.5µl
- H2O: 19µl
Cycling conditions
- 1 cycle of:
- 94°C 5 min
- 15 cycles of:
- 94°C 30 sec
- 50°C 30 sec
- 68°C 45 sec
- 30 cycles of:
- 94°C 30 sec
- 55°C 30 sec
- 68°C 45 sec
- 1 cycle of:
- 68°C 5 min
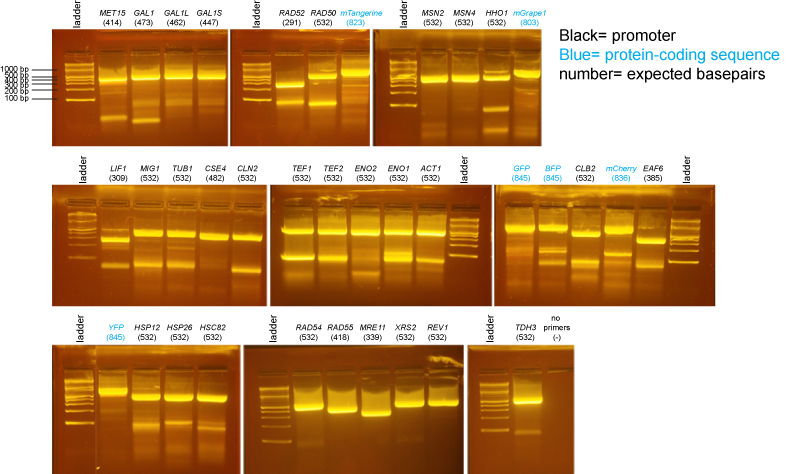
The ladder on all gels is the 2-log ladder (NEB).
2% agarose gels in 1X Sodium Borate buffer: [http://www.biotechniques.com/multimedia/archive/00036/BTN_A_04362BM02_O_36180a.pdf BioTechniques 36:214-216 (February 2004)]
There may be more nonspecific bands in these PCR reactions than is typical either because there was a considerable delay waiting for all students to be ready to add their tubes to the PCR machine or because we had an issue where the program was initially incorrect and we needed to restart the PCR machine after correcting the problem.
We cut the bands of the correct size out of the gel. Then we conducted a gel extraction, using QIAquick Gel Extraction Kit.
Blunting the PCR Product
After we had the purified PCR product, we used the Blunt Cloning Kit (NEB) to blunt and phosphorylate the ends of the PCR product. The blunting reaction was composed of:
- Purified DNA: 15µl
- 10X Blunting Buffer: 2.5µl
- 1 mM dNTP Mix: 2.5µl
- Blunt Enzyme Mix: 1.0µl
- Sterile dH20: 4µl
- Total Volume: 25µl
Digestion of pUC19
The pUC19 vector was digested with SmaI:
- 1µg/µl pUC19 (NEB): 5µl
- 10X NEBuffer 4: 3µl
- SmaI: 1 µl
- H2O: 11 µl
The restriction digest was incubated for 4 hours at 25°C. 1µl of Calf Intestinal Phosphatase (NEB) was added and the mixture was incubated at 37°C for 2 hrs.
Ligation
Next, we did a ligation reaction with the Quick Ligation Kit (NEB). We followed the manufacturer's suggested protocol which was to use a 3:1 molar ratio of insert: vector and 50 ng of SmaI digested/CIP'd pUC19 vector.
Transformation
For the transformation, we used NEB 10-beta Competent E. coli cells (cat # C3019H). We followed the manufacturer's suggested protocol for the transformation, and we plated on LB/Ampicillin/IPTG/X-Gal.
BsaI-digested Miniprep DNA
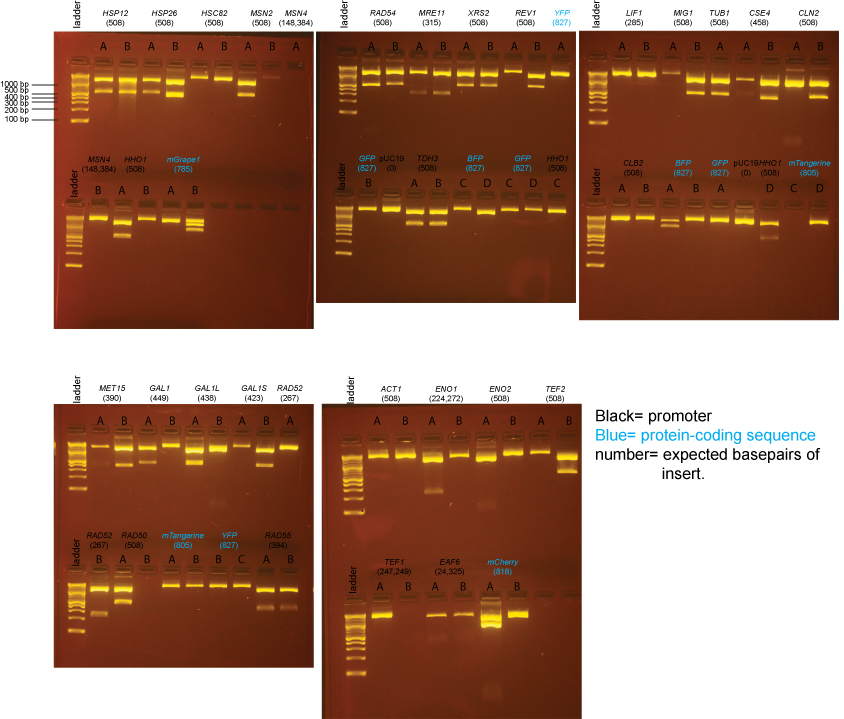
Overall, most plates contained a mixture of blue and white colonies and the number of colonies was fairly low - not much higher than for our "no insert" ligations. We then picked two white colonies from each plate and inoculated 2ml of LB/amp and then mini-prepped the DNA. Blue colonies had intact lacZ genes, and therefore did not contain inserts. The samples on these gels contain BsaI-digested miniprep DNA prepared from individual white colonies from the transformations above.
For the BsaI Digest, we used:
- Miniprep DNA: 4µl
- 10X NEB4: 2µl
- 100X BSA: .2µl
- BsaI: .5µl
- H20: 13.3µl
Expected band sizes from BsaI digests
pUC19 (no insert): 1 cut, 1 band: 2686 bp
pUC19 + insert: 3 cuts, 3 bands: 1354 bp, 1332 bp, insert (expected sizes listed on gel below). Almost all inserts are a single BsaI fragment, but there is an internal BsaI site in the TEF1, ENO1, EAF6, and MSN4 promoters so 2 band sizes are listed for these inserts.
Note that the 1354bp and 1332bp bands will appear to run as one band on the gel.
Based on the data above, we concluded that the following clones had inserts of the correct size:
Promoters
- MET15 yes: B
- GAL1 yes: A
- GAL1-L yes: A
- GAL1-S yes: B
- RAD52 yes: B
- RAD50 yes: A
- RAD54 yes: A, B
- RAD55 yes: A, B
- MRE11 yes: A, B
- XRS2 yes: A, B
- REV1 yes: B
- TDH3 yes: A, B
- LIF1 none
- MIG1 yes: B
- TUB1 yes: A
- CSE4 yes: B
- CLN2 yes: B
- CLB2 none
- ACT1 none
- ENO1 yes: A (we initially forgot there should be 2 insert bands and so continued to try to get clones in the next steps)
- ENO2 none
- TEF2 yes: B
- TEF1 none
- EAF6 none (possibly a band, but too little DNA to be confident)
- HSP12 yes: A, B
- HSP26 yes: A
- HSC82 none
- MSN2 yes: A
- MSN4 none
- HHO1 yes: A, D
Protein-coding sequences
- BFP maybe: A (the insert may be too large)
- GFP none
- YFP none
- mTangerine none
- mCherry yes: A (but bottom band seems possibly too intense)
- mGrape1 none
Extra colonies were picked from the transformations for the following promoter clones:
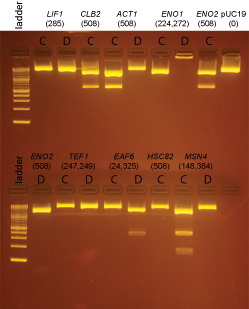
LIF1, CLB2, ACT1, ENO1, ENO2, TEF1, EAF6, HSC82, MSN4
DNA from these clones was miniprepped using Qiagen minipreps. The DNA was digested with BsaI as follows:
- miniprep DNA: 3µl
- 10X NEBuffer 4: 2µl
- 100X BSA: 0.2µl
- BsaI: 0.5µl
- H2O: 14.8µl
BsaI digests were incubated at 37°C for 2 hrs and then run on a 2% agarose gel in 1X sodium borate buffer.
Based on the data above, we concluded that the following clones had inserts of the correct size:
Promoters
- LIF1 none
- CLB2 yes: C
- ACT1 yes: C
- ENO1 none
- ENO2 yes: C
- TEF1 none
- EAF6 yes: D (This was started from culture EAF6-B)
- HSC82 none
- MSN4 yes: C (we initially forgot there should be 2 insert bands and so continued to try to get clones in the next steps)
Obtaining the remaining clones
Because there had been relatively few colonies on most of the transformation plates, we decided to try 2 different strategies for obtaining the remaining clones:
1. Repeat the original blunt ligations using a higher insert:vector ratio.
2. Try a sticky-end ligation strategy since it may have a higher success rate than the blunt ligation strategy. This strategy is outlined in detail below:
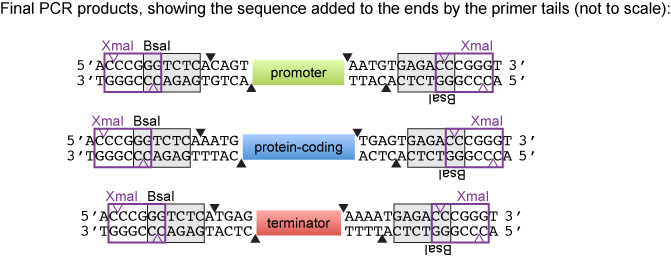
When we designed the PCR primers, we added nucleotides 5' to the BSA recognition site in both the forward and reverse primers. We decided to introduce the sequence 5' CCCGGG 3'which is the site for both SmaI (creates blunt ends) and XmaI (creates sticky ends). According to the NEB catalog, SmaI and XmaI can cut very close to the end of a PCR product. Thus, the introduction served as a backup strategy if the blunt cloning was problematic. The PCR products could be cut with XmaI and ligated into XmaI-digested pUC19.
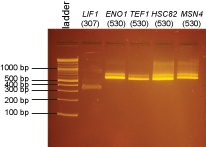
The original PCR reaction was digested with XmaI for the following promoters:
LIF1, ENO1, TEF1, HSC82, MSN4
- purified PCR product: 15µl
- 10X NEBuffer 4: 3µl
- 100X BSA: 0.3µl
- XmaI: 0.5µl
- H2O: 11.2µl
These digested PCR products were run on the gel below:
2% agarose gel in 1X sodium borate buffer:
These bands were excised and purified using the QiaQuick Gel Extraction Kit.
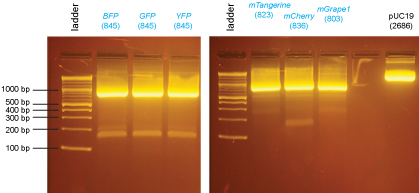
Because the cloning of the fluorescent proteins was particularly problematic, we repeated the PCR of these genes:
- 5ng/µl fluorescent protein vector: 2µl
- 2X OneTaq Mix (NEB): 25µl
- 5µM Forward primer: 2.5µl
- 5µM Reverse primer: 2.5µl
- H2O: 18µl
Cycling conditions
- 1 cycle of:
- 94°C 5 min
- 15 cycles of:
- 94°C 30 sec
- 50°C 30 sec
- 68°C 45 sec
- 30 cycles of:
- 94°C 30 sec
- 55°C 30 sec
- 68°C 45 sec
- 1 cycle of:
- 68°C 5 min
PCR products were purified using the QiaQuick Gel Extraction Kit.
The purified PCR products were then digested with XmaI:
- purified PCR product: 15µl
- 10X NEBuffer 4: 3µl
- 100X BSA: 0.3µl
- XmaI: 0.5µl
- H2O: 11.2µl
These digested PCR products were run on the gel below and the bands were excised and purified using the QiaQuick Gel Extraction Kit.
The pUC19 vector was digested with XmaI:
- 1µg/µl pUC19 (NEB): 5µl
- 10X NEBuffer 4: 3µl
- 100X BSA: 0.3µl
- XmaI: 0.5µl
- H2O: 11.2µl
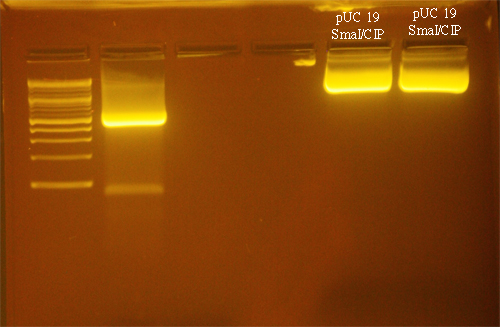
The pUC19 vector was digested overnight at 37°C. Then, the reaction was heated at 65°C for 20min. 1µl of Calf Intestinal Phosphatase (NEB) was added to the reaction and it was incubated at 37°C for 2 hrs. This digested, dephosphorylated vector was run on the agarose gel below.
2% agarose gel in 1X sodium borate buffer:
These bands were excised and purified using the QiaQuick Gel Extraction Kit.
Strategy 1: blunted PCR products were ligated into SmaI/CIP'd pUC19 vector as before, except that a 10:1 molar insert:vector ratio was used.
Strategy 2: XmaI-digested PCR products were ligated into XmaI/CIP'd pUC19 vector using a 6:1 molar insert:vector ratio.
5µl of ligation reaction were transformed and 150µl of the transformation was plated on LB/Amp/X-gal/IPTG.
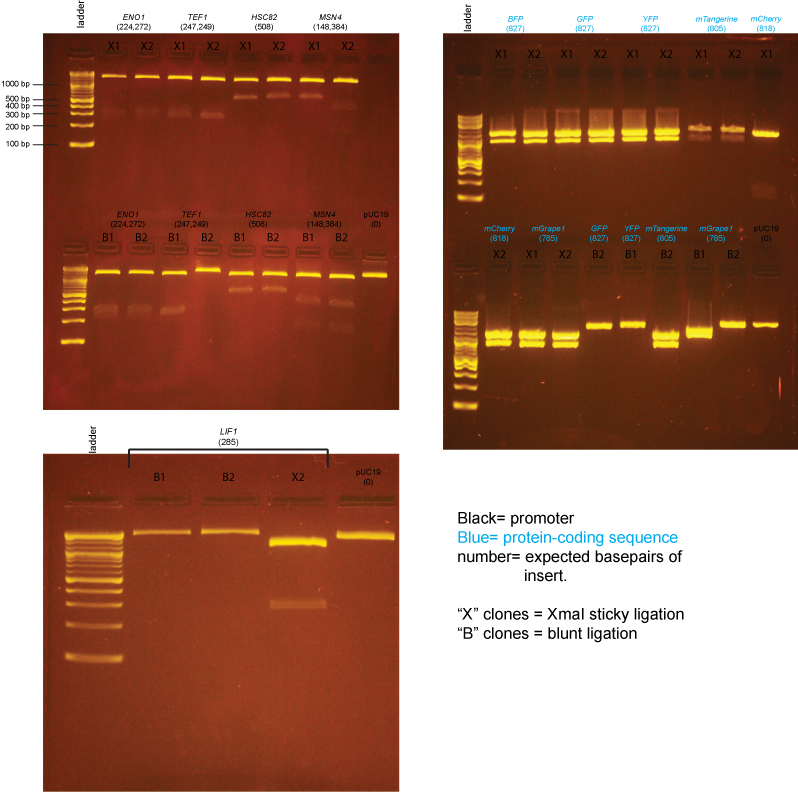
After about 18hrs, the plates with promoter clones had normal-sized colonies, but the colonies on the plates for the fluorescent protein coding sequences were just barely visible. We realized in retrospect that we probably shouldn't have plated the cells for the fluorescent protein sequences on IPTG/X-gal plates. The IPTG induced transcription of B-galactosidase with the fluorescent protein insertion. We know from previous experience with fluorescent protein plasmids that these proteins are somewhat toxic. The toxicity of the fluorescent proteins could explain the small size of the colonies. We would suggest not using blue/white selection for future cloning of protein-coding sequences. These fluorescent protein plates were allowed to grow 2 more days at room temperature before colonies were picked (2 days because we couldn't access the school building on a Sunday). We picked 2 colonies from each plate into LB/amp and miniprepped the DNA. Several of the colonies that we picked from the blunt cloning plates for the fluorescent proteins failed to grow in LB/amp.
BsaI digests to check the clones:
- miniprep DNA: 3µl
- 10X NEBuffer 4: 2µl
- 100X BSA: 0.2µl
- BsaI: 0.2µl
- H2O: 14.6µl
BsaI digests were incubated at 37°C overnight and then run on a 2% agarose gel (promoters) or 1% agarose gel (fluorescent protein coding sequences) in 1X sodium borate buffer.
Based on the data above, we concluded that the following clones had inserts of the correct size:
Promoters
- LIF1 yes: X2
- ENO1 yes: X1,X2,B1,B2
- TEF1 yes: X1,X2,B1
- HSC82 yes: X1,X2,B1,B2
- MSN4 yes: X2,B1,B2
Protein-coding sequences
- BFP yes: X1,X2
- GFP yes: X1,X2
- YFP yes: X1,X2
- mTangerine yes: X1,X2, B2
- mCherry yes: X2
- mGrape1 yes: X1,X2
NOW WE HAVE ALL THE CLONES!!!
Return to our main page.
 "
"
